(K)Ubuntu Gutsy Gibbon
About two months ago Ubuntu 7.10 aka “Gutsy Gibbon” was released and I couldn’t resist… So I first gave the KDE flavored amd64 version of Kubuntu a chance which worked very good. Out of curiosity I recently changed to Ubuntu with Gnome desktop.
Installing (K)Ubuntu is pretty easy. If your system has at least 320MB of RAM download the “desktop CD”, boot it and click the “Install” icon on the desktop. When booting from the Desktop-CD, your screen might go blank right after the desktop shows up for the first time. If so, just hit any key and it should reappear. Or maybe I’m the only one who ran into this? To avoid such things I prefer the “alternate” CD which isn’t harder to use. I won’t concentrate here on installing (K)Ubuntu Gutsy as it’s very straight forward and not different from former (K)Ubuntu releases. This post will be about customizing Gutsy and how to avoid/repair some small issues you might run into.
First dist-upgrade
The first thing I do after successfully installing a Linux distro is updating it to the latest packages released. With (K)Ubuntu I’d edit “/etc/apt/sources.list” and comment out the installation CD. This way, apt will download all packages from the online repositories. To do so, open sources.list with your favorite editor:
1
$ sudo gedit /etc/apt/sources.list
and put a “#” at the beginning of “deb cdrom:[Ubuntu 7.10 _Gutsy…”. It should look something like this:
1
#deb cdrom:[Ubuntu 7.10 Gutsy Gibbon - Release amd64 (20071016.1)]/ gutsy main restricted
Save the file an update the package list by typing:
1
$ sudo apt-get update
I prefer doing the first and probably big update without running X server. So, close all running programs and stop X by
1
$ sudo /etc/init.d/gdm stop #Ubuntu
or
1
$ sudo /etc/init.d/kdm stop #Kubuntu
Then login in again (you may need to change the terminal by hitting
1
2
$ sudo apt-get update
$ sudo apt-get dist-upgrade
With Ubuntu I ran in first problems here. When configuring “ttf-opensymbol” apt complained about not being able to update the fonts cache:
1
2
3
4
5
6
7
8
9
10
11
12
Richte ttf-opensymbol ein (1:2.3.0-1ubuntu5.3) ...
Updating fontconfig cache...
/usr/share/fonts: failed to write cache
/usr/share/fonts/X11: failed to write cache
/usr/share/fonts/X11/100dpi: failed to write cache
/usr/share/fonts/X11/75dpi: failed to write cache
/usr/share/fonts/X11/Type1: failed to write cache
/usr/share/fonts/X11/encodings: failed to write cache
/usr/share/fonts/X11/encodings/large: failed to write cache
/usr/share/fonts/X11/misc: failed to write cache
/usr/share/fonts/X11/util: failed to write cache
...
I knew this bug from my first experiences with Debian Lenny and from Ubuntu Feisty. I don’t know why It reappeared, you can read the bug report at Launchpad. Don’t worry about it, the update will configure everything else right. I ran into another small issue when first updating Ubuntu: a lot of error messages like
1
/var/lib/scrollkeeper/fr/scrollkeeper_extended_cl.xml:4568: parser error : Extra content at the end of the document <sect ...>
appeared. This bug is also listed at Launchpad here. The update will work and we’ll fix those two issues later. When the update has finished, apt will tell you about some unconfigured packages, mostly related to OpenOffice. Anyway, just reboot:
1
$ sudo shutdown -r now
Upon reboot, login again, open a terminal and type
1
$ sudo apt-get dist-upgrade
You will be again presented the above mentioned errors. Open a second terminal and for each directory with “failed to write to cache” type i.e.:
1
$ sudo touch /usr/share/fonts
…and so on… When you’re done, type
1
$ sudo apt-get dist-upgrade
again and this time every remaining package should be configured fine.
To get rid of the scrollkeeper errors, we need to rebuild the scrollkeeper database (I found this solution here and it worked for me):
1
$ sudo scrollkeeper-rebuilddb
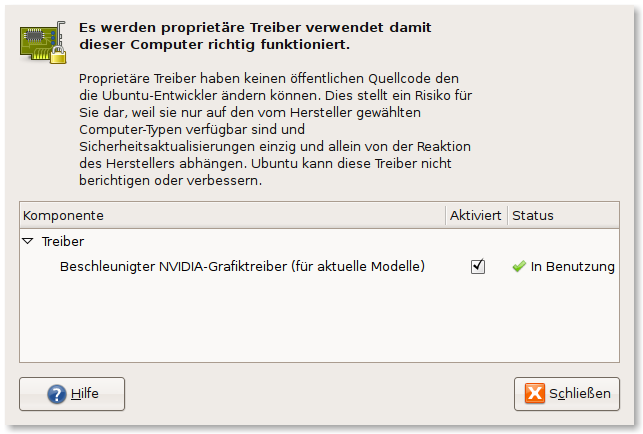
So far, so good. If you need to install any restricted drivers, like the Nvidia ones, this is the right time. If you’re running Ubuntu go to “System -> Administration -> Restricted Manager” (see screenshot below), if you’re running Kubuntu you’ll find the “restricted manager” in “KDE Control Center”. Just check the driver you want to install and it will be downloaded and configured properly. In my case, I installed the Nvidia driver and upon reboot I had Compiz running (only with Ubuntu, no default desktop effects in Kubuntu!).
Firewall
If connected to the internet through a router it may not be considered necessary but I like to install a firewall (or, to be precise a utility to configure iptables). My choice is guarddog. There are other tools as well (e.g. firestarter), but I like guarddog best. Guarddog is a written for KDE so it will pull some KDE dependencies when installed in Ubuntu.
TIP: If you’re installing guarddog in Ubuntu, I’d recommend installing and running kcontrol first (of course not necessary if running Kubuntu). As you have to run guarddog with root privileges it’ll create some configuration files in your home directory (~/.kde) - and those will then be owned by root. You could change this later with
1
$ sudo chown <your-username>:<your-group> file1 file2 ... fileX
But I think it’s easier to launch kcontrol as it will create those files and they will be owned by you. To get it done by typing (“XX” for your language):
1
$ sudo apt-get install kcontrol kde-i18n-XX guarddog
Then run
1
$ kcontrol
and tweak the settings as you like. Now start guarddog:
1
$ sudo guarddog
and configure your firewall. Done!
Boot options
If you needed any special boot options to make Gutsy boot, they were added automatically to the default boot entry in grub - but not to the alternatives, like “recovery mode”. You have to add your boot options manually to the alternative boot entry . Edit “/boot/grub/menu.lst “ as follows:
First search for
1
2
3
4
5
## altoption boot targets option
## multiple altoptions lines are allowed
## e.g. altoptions=(extra menu suffix) extra boot options
##      altoptions=(recovery) single
# altoptions=(recovery mode) single`
and add your boot option to the last line, like
1
# altoptions=(recovery mode) single _<your-option>
What does that line do? In the future - when kernel updates are installed - update-grub automatically adds _
1
2
3
4
1. title           Ubuntu 7.10, kernel 2.6.22-14-generic (recovery mode)
2. root            (hd0,1)
3. kernel          /boot/vmlinuz-2.6.22-14-generic root=UUID=xyz03bb8-1000-1234-b7b2-abcdeb01fa3b ro single
4. initrd          /boot/initrd.img-2.6.22-14-generic`
To add
1
kernel          /boot/vmlinuz-2.6.22-14-generic root=UUID=xyz03bb8-1000-1234-b7b2-abcdeb01fa3b ro single <your-option>
I think the installer should add all options to all boot entries, but right now it doesn’t. Anyway, now you could boot your system even in recovery mode! (Hopefully not necessary…)
The trouble with flashplugin
By the time of writing, the package “flashplugin-nonfree”, which provides Adobes Flash Player, is broken due to an update by Adobe. Adobe does not permit others to distribute their plugin, so what the package does is downloading the software from Adobe’s ftp site and unpack the plugin to the right places. If you try to install the Ubuntu package at the moment, you will receive an error that md5 sums won’t match - which is not surprising, because Adobe provides a new version (9.0.115.0). So, why doesn’t the package maintainer just make a new package? Well, this is a little tricky, because version 9.0.115.0 brakes compatibility with Konqueror. There is some discussion going on at Lauchnpad about this issue. I guess, for fresh installs of Gutsy there are two possible solutions, which are also mentioned at Launchpad:
- download the new flashplugin from Adobes web site and install it to your home directory (it’ll end up in ~/.mozilla/plugins)
- get the source of the “flashplugin-nonfree” package for Hardy Heron (which is the next Ubuntu release) and make a package for Gutsy
Of course, both solutions leave Konqueror without flash (to be precise, Konqueror is likely to crash) - but that’s the curse with closed source software…
I decided to follow the instructions to build a new “flashplugin-nonfree” package and it worked great. I don’t use Konqueror for browsing the web, so I don’t mind flash not working with it. I’d recommend that way too, because it’s the Debian way! ;-) This is what you have to do.
Make sure those packages are installed:
- build-essential
- debhelper
- fakeroot
- dpkg-dev
- debhelper
If you’re running Ubuntu for amd64, also add:
- nspluginwrapper
- ia32-libs
Once everything is installed, download the source of the “flashplugin-nonfree” package for Hardy Heron from here open a terminal and change into the directory where you stored the just downloaded flashplugin-nonfree_9.0.115.0ubuntu2.tar.gz.
1
2
3
4
5
6
$ sudo apt-get build-dep flashplugin-nonfree
$ tar xvf flashplugin-nonfree_9.0.115.0ubuntu2.tar.gz
$ cd flashplugin-nonfree-9.0.115.0ubuntu2
$ dpkg-buildpackage -b -rfakeroot
$ cd ..>
$ sudo dpkg -i  flashplugin-nonfree_9.0.115.0ubuntu2__<i386/amd64>_.deb
The exact file name of the package depends on your machines architecture. If you’re running Ubuntu for amd64, are too lazy for the above and trust me, you can download my package from here:
- Ubuntu Gutsy flashplugin-nonfree package (amd64): flashplugin-nonfree_9.0.115.0ubuntu2_amd64.zip (md5sum:
86cbde41601da29a66511ae1508c3975)
As always, have fun!
EDIT - January 26, 2008:
The new Hardy source files for flashplugin-nonfree seem to introduce some new dependencies which cannot be met with Gutsy. Installing the build package will fail. Installing the plugin from Adobe’s website to ~/.mozilla/plugins works - at least I can confirm this for i386.