Fedora 9 & Acer Aspire 5572 ZWXMi with encrypted file systems
This HOWTO is listed at TuxMobil - Linux on Laptops, Notebooks, PDAs and Mobile Phones
A year has passed since installing Ubuntu Feisty on my Acer Aspire 5572 notebook and it was about time to try something new. With recent Linux distributions a lot of manual configuration tasks are not necessary anymore and things became easier. There is no big difference between installing Ubuntu Feisty or a current Hardy on this laptop, except with Hardy almost everything works out of the box. But I wanted to try something different and I wanted encrypted file systems which are easy to set up. Fedora 9 has those features so I gave it a try. (Of course this would be possible, too with Ubuntu, but Fedora comes with an installer which handles file system encryption very nicely.) So here’s my HOWTO on installing Fedora 9 with encrypted file systems on an Acer Aspire 5572 ZWXMi notebook.
If you have sensitive data on your notebook you might feel a bit safer with encrypted file systems. If you want to access encrypted file systems you have to enter the correct passphrase otherwise the data on that file system is not readable. Of course there is a solution for Linux which is called LUKS (Linux Unified Key Setup). The Fedora installer anaconda features an easy way to set up this file system encryption. In the example given here, with the exception of “/boot”, everything will be encrypted and thus you need to enter your LUKS passphrase at every boot to enter the “/” file system. Of course you may choose to encrypt “/home” or a data partition only. Then you would be able to boot without passphrase (but loosing access to those encrypted file systems). No matter what you choose to encrypt, be aware that you need to have a correct passphrase to access your data!
WARNING: WHEN USING ENCRYPTED FILE SYSTEMS, YOUR DATA WILL BE LOST WITHOUT CORRECT PASSPHRASE!!!
Keeping this in mind we can now continue. First of all download Fedora 9 from here. I’d recommend the Fedora Desktop Live CD. There will be a lot of updates right after installation and this way you’ll only have a minimum amount of software installed and you’re free to install everything you need after updating the initial installation. (I’d stay away from the KDE version, as it comes with KDE 4 which is not really ready for everyday use - believe me…)
Installation/partitioning
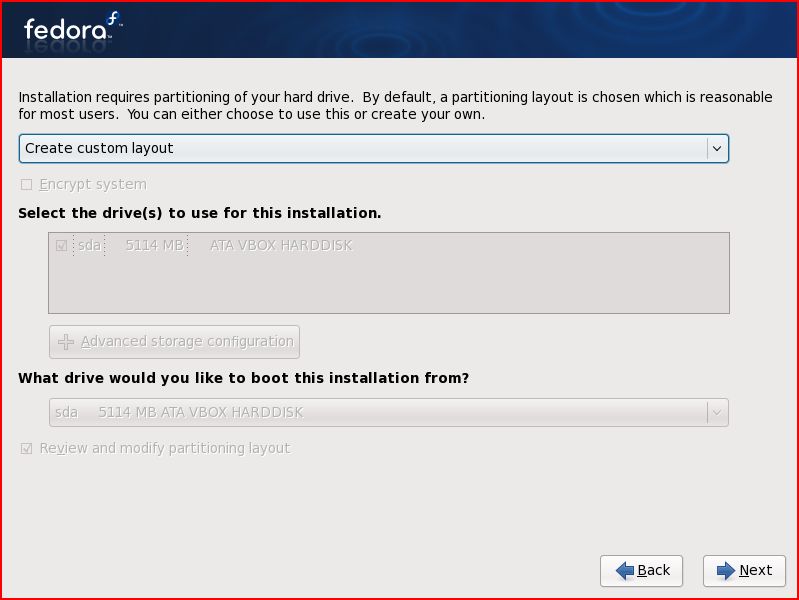
Once the iso is downloaded and burned to CD you’re ready to boot from this CD, which will bring you to a standard Fedora 9 GDM login screen. Choose your language there, log in and start the Fedora anaconda installer by double clicking the desktop icon. This will lead you through some simple questions like keyboard layout, timezone, host name and root password. When it comes to partitioning your hard disk, we need to configure a custom layout, which you should choose from the drop down menu.
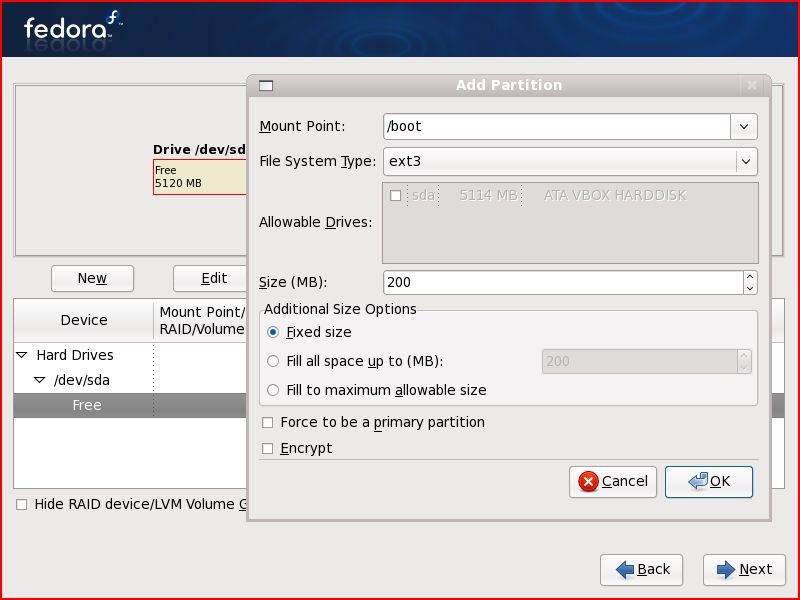
First, generate a small partition which is not encrypted for /boot. I’d make it at least 100MB, but if space is no matter I’d give it some 250-500MB. This leaves room for more kernels.
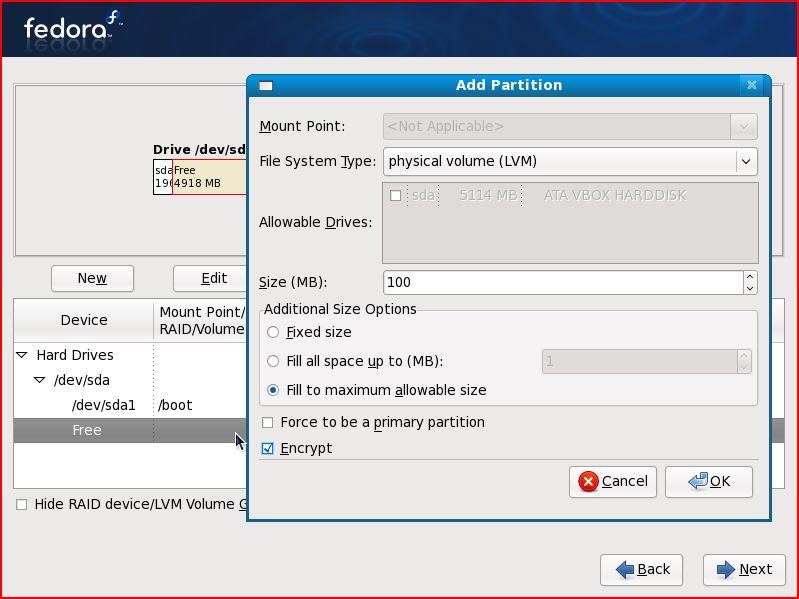
Then create a volume via LVM (Logical Volume Manager) which will later incorporate our logical volumes for “/”, etc. So, create a new partition and choose “physical volume (LVM)” as file system type. I chose to use the remaining disk space as I didn’t intend to install other OSes, but that depends on what you’re planing. Don’t forget to check “Encrypt”! After clicking “OK” you will be prompted for a password. Remember that password carefully, as you won’t be able to access your encrypted data with out it!!!
So for now we have an empty volume group which we need to fill with logical volumes. To do so, highlight the volume group and click the “LVM” button. This will present a new screen which shows the physical partitions of this volume group at the upper and the incorporated logical volumes at the lower part. Well, the latter should be empty, but we’ll change this by hitting the “Add” button. You can now choose mount point, file system type and size. I created a 2048MB swap space, and two very large ext3 logical volumes for / and /home - but that’s up to you.

When finished, click “OK” and you can then see the summery of what will be written to your disk. It may look something like this next screenshot:
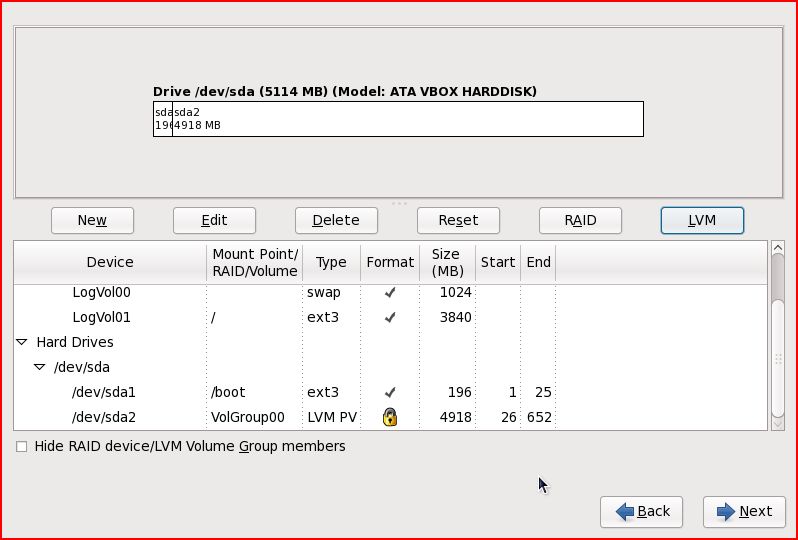
We now created an encrypted physical volume (marked with the “lock” icon) in which our logical volumes (like “/”) reside. Click next and you need to confirm that those changes should be written to disk. When everything is formatted Fedora will install files. After this the installer should tell you, that Fedora was successfully installed and it’s time to reboot. Be careful not to boot from the Fedora Live CD again! On first boot, Fedoras assistant will come up letting you create a user for your system. We now have Fedora 9 successfully installed!
Update
Most things like screen resolution, sound and even standby and hibernating work out of the box. Again (like with Ubuntu Feisty), I have no idea if the card reader works, as I don’t use it. There’s one thing we need to put hands on: WLAN. But first, I’d recommend updating everything. For both tasks we need a wired internet connection for now. If internet connection is established and working, open a terminal, become root, update yum, drop to runlevel 3 and update the rest:
1
2
3
4
5
6
$ su -
$ yum update yum
$ init 3
(login again)
$ su -
$ yum update
This could take a while. When done reboot:
1
$ shutdown -r now
WLAN
Now let’s get our WLAN working! I found some very useful help at the Unofficial Guide to Fedora.
Make sure “b43-fwcutter” is installed:
1
$ rpm -qa | grep b43-fwcutter
If nothing is returned then install it by
1
2
$ su -
$ yum install b43-fwcutter
Create a temporary folder or just go to /tmp or whatever you like, download, extract and install the firmware:
1
2
3
4
5
6
$ cd /tmp
$ wget http://downloads.openwrt.org/sources/broadcom-wl-4.80.53.0.tar.bz2
$ tar -jxvf broadcom-wl-4.80.53.0.tar.bz2
$ su -
$ cd /tmp/broadcom-wl-4.80.53.0/kmod
$ /usr/bin/b43-fwcutter -w /lib/firmware wl_apsta.o
Restart NetworkManager by
1
2
$ su -
$ service NetworkManager restart
and you’re ready to configure your WLAN via the NetworkManager applet at the top right of your screen!
Disable sshd
If you don’t need to access your laptop via ssh, I’d turn ssh daemon off (I found sshd enabled by default when installing from DVD, not when installing from Live CD. But just to make sure):
1
2
3
$ su -
$ service sshd stop
$ chkconfig --level 0123456 sshd off
And delete the corresponding firewall rule: SYSTEM -> ADMINISTRATION -> FIREWALL. Go to “Other Ports”, delete “ssh” and click apply.

Add repositories/MP3 support
That’s about it! You may add some extra yum repositories, like livna.org. Download the “Fedora 9 repository RPM” and install it via
1
2
$ su -
$ rpm -ihv /path/to/livna-release-9.rpm
Once installed, you can easily add MP3 support with
1
2
$ su -
$ yum install gstreamer-plugins-ugly libmad libid3tag id3v2
Have a look at the Unofficial Guide to Fedora for further tips and tricks. You’re done now. Have fun!